Action: Create a Record in ServiceNow
Cloudhouse Guardian (Guardian) lets you configure actions that are triggered when certain events take place. For example, with a ServiceNow integration, you can automatically create a ServiceNow record in the event of a failed scan in Guardian. Your team can then use that ServiceNow record to ensure the issue is addressed and remedied. You can configure this using an Action in your Guardian instance.
Note: The following process assumes you have a ServiceNow integration already configured in Guardian. For more information, see ServiceNow Integration.
Tip: For an overview of actions in Guardian, including more options available to choose from, see Actions.
Action Settings
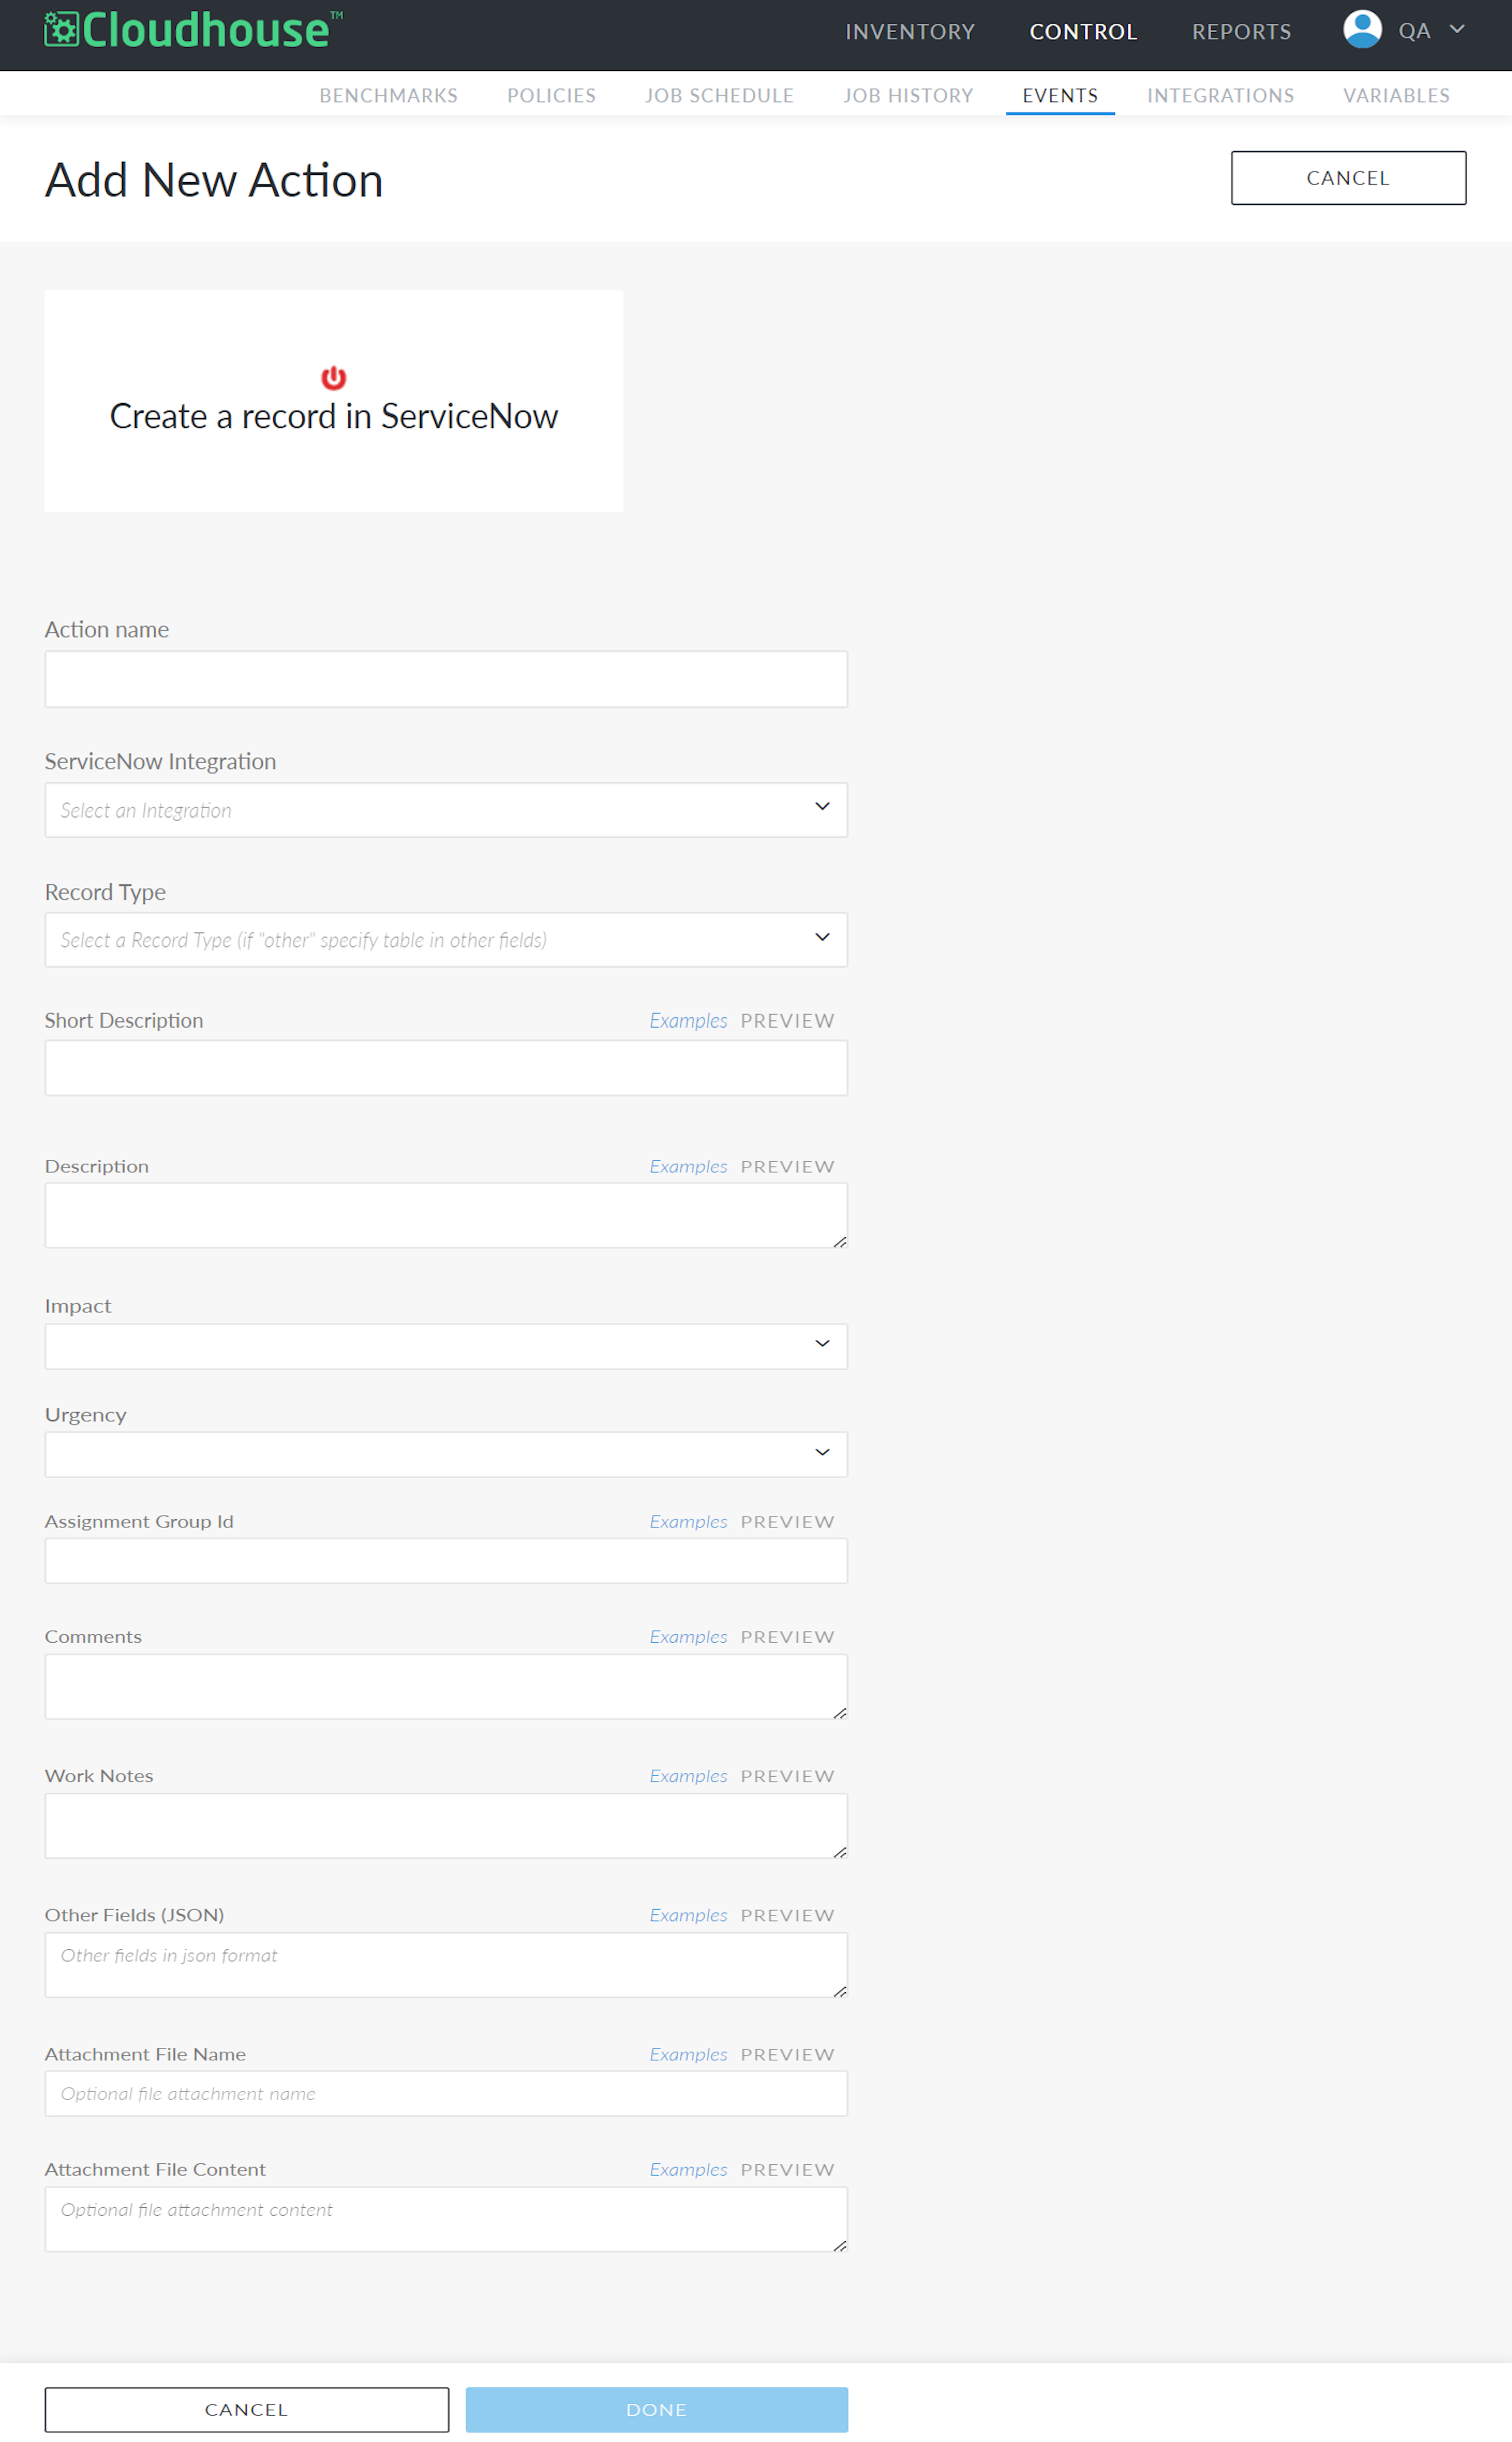
When configuring a Create a Record in Freshservice action, the following settings are presented:
| Setting | Description |
|---|---|
| Action Name field | A unique name for the action. This name is how you will identify this action among all others configured in your Guardian instance, so ensure it is descriptive. For example, 'Failed Policy ServiceNow Record' and not simply 'ServiceNow Record'. |
| ServiceNow Integration drop-down list |
A list of all ServiceNow integrations configured in your Guardian instance. From the drop-down list, select the ServiceNow integration you want to use for this action. |
| Record Type drop-down list |
A list of record types available in ServiceNow. From the drop-down, select one of the following options to assign to the records created by this action:
Note: If selecting Other, you must define the record type you want to use by including it in the Other Fields (JSON) setting. For more information, see the description for this field below. |
| Short Description field | A brief summary of the event that triggered the action. What you enter here will be used in the Short Description field of the resulting ServiceNow record. Think of this as a title for each record.
To make your descriptions dynamic, you can include variables in this field. Variables are pieces of text that Guardian will replace with relevant data. For example, you could use the variable {{ policy }} to indicate which specific policy triggered the action. When a ServiceNow record is created, you will see that policy name in place of the variable. |
| Description field |
A detailed overview of the event that triggered the action. What you enter here will be used in the Description field of the resulting ServiceNow record. You can include more detail here to help the assigned group address the issue. As in the Short Description field, you can use variables here to make your descriptions dynamic. |
| Impact drop-down list |
A list of impact levels you can assign to records in ServiceNow. Consider the event you're using to trigger this action when determining the impact. For example, a single failed node scan might have a lower impact than a failed environment scan. From the drop-down, select one of the following:
|
| Urgency drop-down list |
A list of urgency levels you can assign to records in ServiceNow. Consider how quickly your team needs to address the triggering event when determining the urgency. For example, an integration failure in Guardian might call for more urgent remediation than a node failing a policy scan. From the drop-down, select one of the following:
|
| Assignment Group ID field | In ServiceNow, an assignment group is the team responsible for resolving a given issue. To designate a specific assignment group for records created by this Guardian action, enter the ID for the ServiceNow assignment group here. |
| Comments field |
Any additional information you wish to include in your ServiceNow records outside of the description fields. Comments are visible to everyone who has access to your ServiceNow records. If you want to include extra details that are only visible to the team working on each record, refer to the Work Notes field below. As in the Short Description field, you can use variables here to make your descriptions dynamic. |
| Work Notes field |
In ServiceNow, work notes are used to communicate internally within a support team to track the progress of a task. Work notes are similar to comments, however work notes are only visible to the support group assigned to the task. Depending on who has access to your ServiceNow instance, you may choose to keep some notes private by including them as work notes rather than comments. As in the Short Description field, you can use variables here to make your descriptions dynamic. |
| Other Fields (JSON) field |
Data you wish to use to populate any other fields relevant to your ServiceNow records. You can enter a JSON body in this text box to set the values of fields not present when configuring this action. If you selected a Record Type of 'Other', you need to define that other record type here using JSON. ServiceNow refers to record types as tables, so your JSON would look like this: Copy
In the above example, you would replace |
| Raise Incident Per Change Request checkbox |
This option is only displayed if you select 'Incident' from the Record Type drop-down list. Select this checkbox to compile all failed CIs into a single incident within a change request, rather than an incident per CI. Tip: This feature was introduced in V3.65.0 of the Guardian web application. To access this feature, upgrade to this version of Guardian or above. For more information, see April 2026 Quarterly Release |
| Attachment File Name field |
Guardian gives you the option of attaching a text file to the ServiceNow records that are created using this action. You might choose to do this if there is content you want to separate from the various description/comment fields above. In this field, enter a name to assign to the text file. Then, enter your desired content in the Attachment File Content field. |
| Attachment File Content field |
The content you want included as a text file on your ServiceNow records. Here, you could include the details of a failed policy or other information relevant to the record being created. As in the Short Description field, you can use variables here to make your descriptions dynamic. |
These settings are configured when adding a new action, and they can also be edited at any time through the Actions tab ( ) and select Edit. Once you have made your edits, click Done to save them.
Add a Create a Record in ServiceNow Action
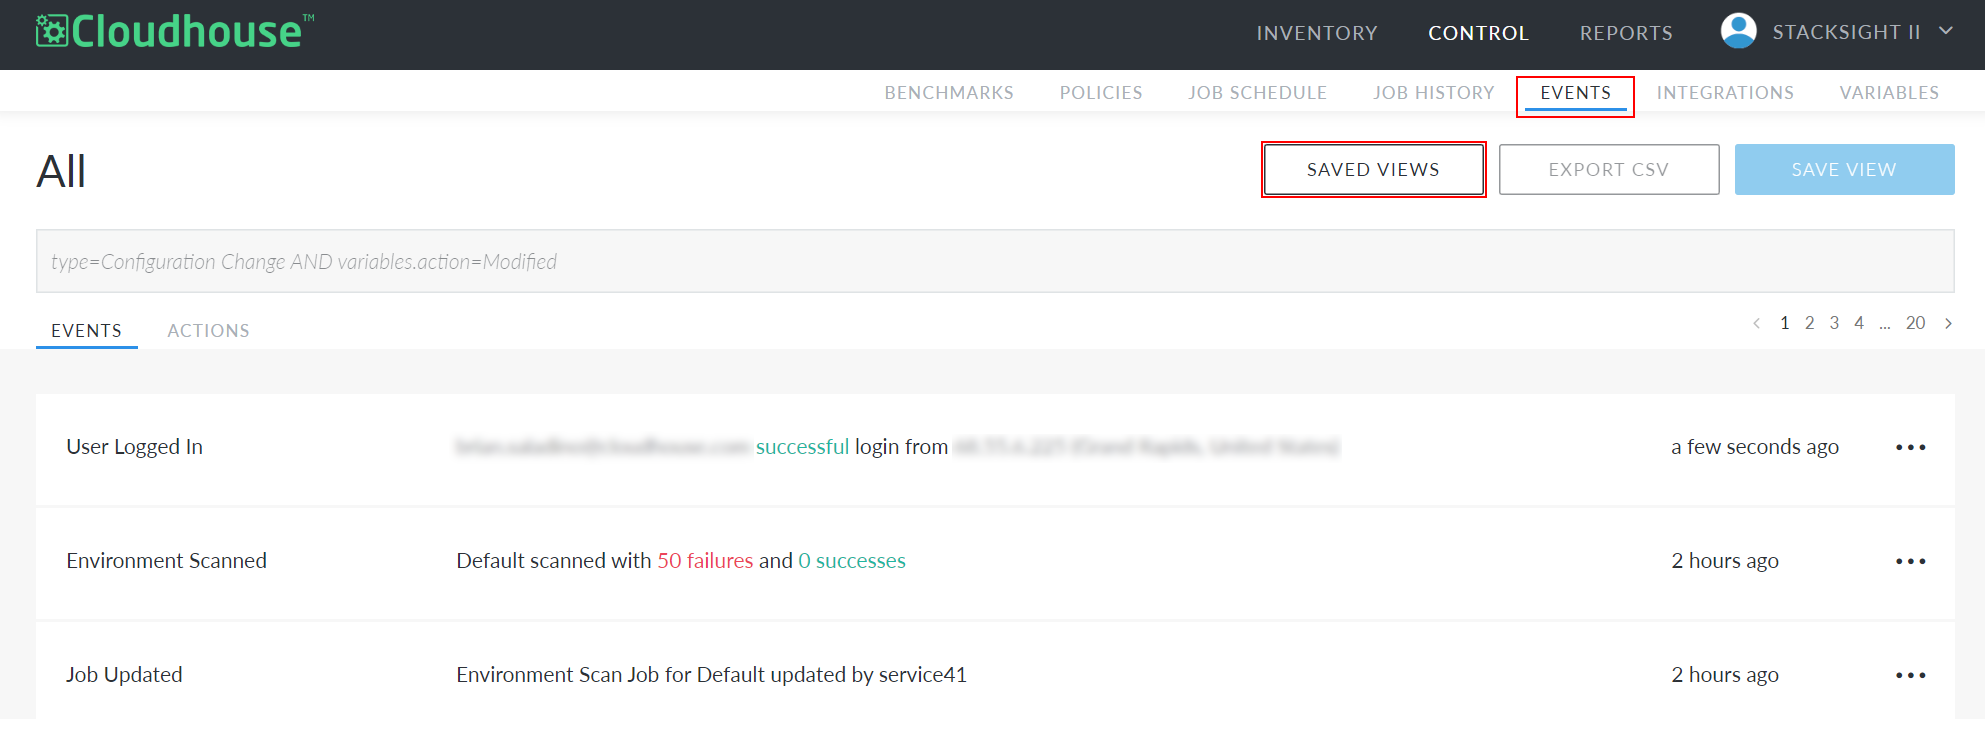
You can add a new Create a Record in ServiceNow action from any saved view in your Guardian instance. Each saved view represents a specific event determined using a query on the Events page. The saved view you select during this configuration determines the corresponding event that triggers your new action. For more information, see Saved Views.
To add a Create a Record in ServiceNow action, complete the following process:
Tip: For help completing any of the following fields, refer to their respective descriptions in the Action Settings table above.
-
Navigate to the Events tab (Control > Events).
-
Click the Saved Views button at the top of the page. The Saved Views side panel is displayed.
-
Select the event you want to trigger your new action. The saved view for that event is displayed.
-
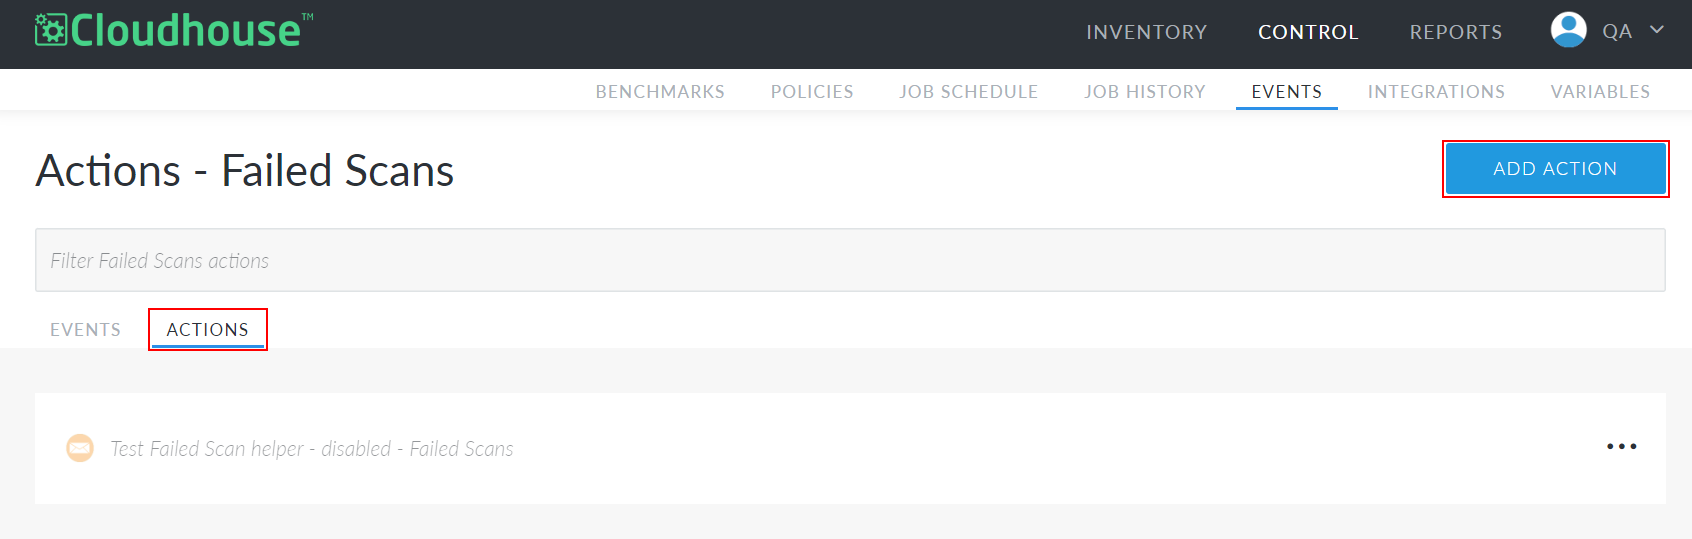
Click the Actions tab to display all existing actions configured for this event.
-
Click the Add Action button. The Add New Action page is displayed.
-
Click Create a Record in ServiceNow. The required fields are displayed.
-
Enter an Action Name.
-
Select an integration from the ServiceNow Integration drop-down.
-
Select a Record Type.
-
Enter a Short Description and a Long Description.
-
Select an Impact and Urgency.
-
Enter an Assignment Group ID.
-
Enter any relevant Comments and Work Notes.
-
Enter a JSON body in Other Fields to define any fields in your ServiceNow records that are not listed here.
-
Enter an Attachment File Name and Attachment File Content.
-
Optionally, click the Raise Incident Per Change Request checkbox.
Note: This option is only displayed if the Record Type drop-down list is set to 'Incident'.
-
Click Done.
Now, a confirmation dialog is displayed and you are redirected to the Actions tab for your selected saved view. Here, you can view your new action. To disable, edit, or test the action, click the Ellipsis () and select the appropriate option.